Windows 10 is the latest operating system from Microsoft, which was launched last July but if you’re still wondering how to take a screenshot on your computer natively, here are a few things that you can use to take a screenshot on your computer. It involves using a pre-installed tool in Windows 10 or just doing it without using any tool at all. You can also use a third-party tool for added functionality. Let me guide you through that.
Before you begin, if you are using Windows 10, it is a good idea to check out our Ultimate Windows 10 Tips & Tricks, a post that lists all the tips and tricks that we’ve covered on the blog ever, especially the best ones.
Using the Snipping Tool
The Microsoft Windows Snipping Tool was introduced in Windows Vista, and it has been in every version of Windows built after that. It just acts as a utility to capture screenshots easily without having to use any other utility. To get started using this, search for Snipping Tool from your Start Menu and start it.
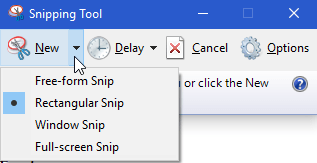
Then, just choose the New option to take a screenshot or click on the drop-down arrow to choose other options for a screenshot like Full-Screen Snip, Window Snip, Rectangular Snip and a Free-Form Snip. It’s very easy to take screenshots this way.
Using the Print Screen Button
Using the Print Screen button to take a screenshot is the oldest method in the book to take a screenshot. On a Windows Computer, press the Prt Sc Button on your keyboard and it will take a screenshot of the entire screen and copy it to your clipboard. Now, you’ll need a tool like either Microsoft Paint or even Microsoft Word, where you can then use the “Ctrl + V” paste shortcut to paste the screenshot. If you’re saving it using Microsoft Paint, you’ll need to give a filename and type when you save.
If you want to take a screenshot of a particular window that is open on your computer, make sure that window is currently active and then press Alt + Prt Sc on your keyboard. Doing so will only take a screenshot of the active window and not the entire desktop. Then follow the same steps as above to save your screenshot.
Using a Third Party Tool
There are many third-party tools out there that you can use to take screenshots on your Windows computer. The ones that I have personally tried include SnagIt and Greenshot. SnagIt is a paid software, but you can try it for free for a few days. Greenshot, on the other hand, is free to use, forever. Download Greenshot from their official website and install it like you’ll install any other application. When you start it, go to its preferences and define your own hotkeys to take screenshots. I have set the following hotkeys to make my job easier when taking screenshots.
Here, you can also define which format the images are saved in and in which location. After you’re done doing all that, just use any of your hotkey combination to capture a screenshot. When you capture a screenshot, you’ll have a few options that you can choose from regarding your screenshot. Choose the one you want and it’s done.
I’ve listed three of the most commonly used ways to take a screenshot on a Windows 10 computer but personally I just use the Greenshot method that I described in the last section. I like the added functionality that I get with the Greenshot Tool and that I don’t have to open up Microsoft Paint every time I want to save a screenshot. Using such a third-party tool definitely increases your productivity and if you’re like me who has to take a lot of screenshots daily, this tool comes in handy.


